Buying your first gaming laptop is often a euphoric experience. You simply can’t wait to test it out. However, that excitement may soon fade after the discovery that you need to optimize laptop for gaming. The thought alone can be a source of anxiety, although it should never be.
As a novice, you might have found most articles on how to optimize laptop for gaming overwhelming. We promise to make it simpler and tell you all that you need to do to make your games run more smoothly on your gaming laptop.
What comes to your mind when you hear people talk about how to optimize laptop for gaming? Is it purchasing new RAM or making software tweaks? Well, it can be a bit of both.
ALSO READ: Best Gaming Laptops Of 2023
One thing that we can tell you is that gaming on Windows 11 is not any better than gaming on Windows 10. If you have been thinking about making that upgrade, you might as well apply the brake on that.
There are instances when your laptop may be running a game smoothly but after a few weeks you start to experience lags on the same game. This gets a lot of people nervous with the thought that their laptop is broken. Regardless of what the issue may be, below are steps to optimize laptops for gaming.
How do I optimize my laptop’s performance?
There are two ways to optimize laptop for gaming namely hardware and software. The mistake that many gamers make is that they pay too much attention to optimizing the hardware and forget about the software. The result is that their games still run sluggishly.
This is usually a huge source of frustration because hardware upgrades don’t come cheap. On the other hand, software upgrades are usually cheaper and sometimes involve making tweaks to your laptop settings or just making sure that there is no other app running in the background.
One important fact that you should keep at the back of your mind when it comes to optimizing your laptop for gaming is that, unless you are building your laptop from scratch, you will often be limited in some kind of way.
To properly optimize your laptop for gaming, you need to work on both the hardware and software. See the different things you can do to improve the performance of your laptop while gaming below.
Optimize laptop for gaming: Software tweaks
Most software tweaks will not cost you a cent except for having a good internet connection. Other tweaks can be easily done by navigating through different settings of your laptop. Although this is where gamers should focus more of their energies when trying to optimize laptop for gaming, it is often the most neglected area.
Below are some of the tweaks that can be done on the software end to optimize laptop for gaming. Depending on your system, you may need to try a few or all the tweaks mentioned below to get the best performance for your games.
#1. Close unnecessary background apps and processes
After closing most programs, they will continue to run in the background, consuming your processing power and RAM. These programs may make it harder for your game to use the full processing power of your PC.
ALSO READ: Another PlayStation Studio, Media Molecule, Hit By Layoff. 20 Employees Impacted
The first step towards optimizing your gaming laptop is to find and close the CPU-hungry apps and processes running in the background. In some cases, that is probably all you need to do to get your game to run optimally again.
- To find and close unnecessary apps and processes, press the “Windows button” and “X” together.
- Locate “Task Manager” and click on it
It would show you all the apps and processes running in the background. Simply select any of the apps or processes you want to close and click on the “End Task” button at the bottom right corner.
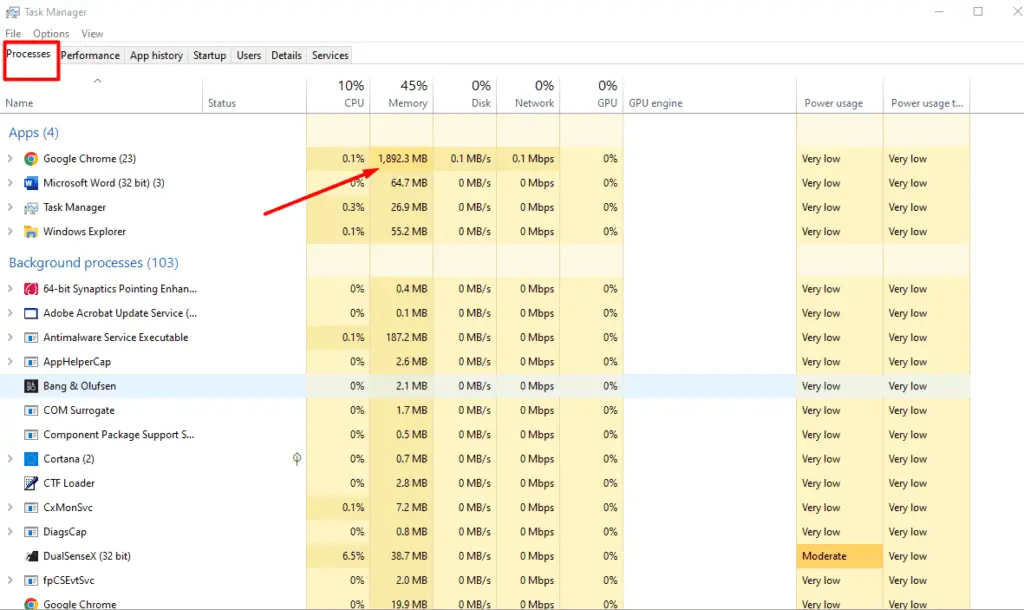
If the problem was from too many background apps consuming CPU resources, you should see a significant improvement in the performance of your games.
#2. Update your drivers
When you purchase a new laptop, depending on the year of its production, it is highly likely that the drivers may not be up to date. Most games require newer drivers to perform optimally. Interestingly, updating your drivers can be done within minutes, if you have a good internet connection.
To update drivers, press the “Windows button” and “X” together.
Locate the “Device Manager” and click on it
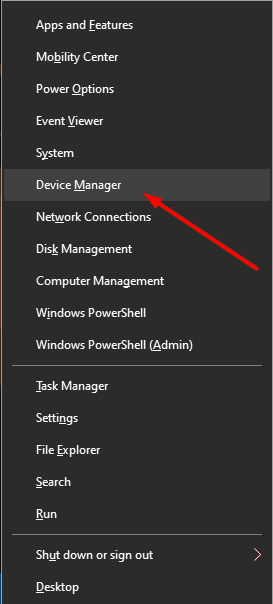
In the device manager, click on each of the functions to expand them.
Right-click on each of the components and select “Update Driver”. Do this for all your device drivers.
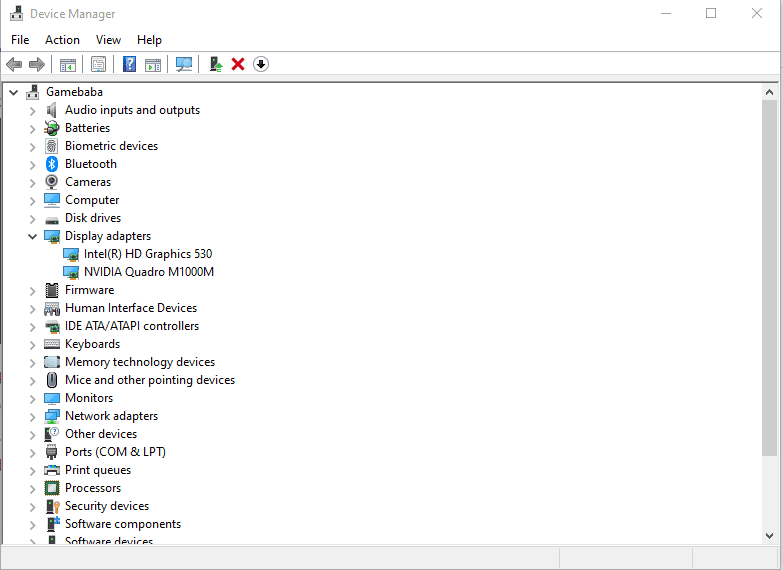
For the graphics card, you may need to head over to the manufacturer’s website to find an update. Whether you have Intel, AMD, or NVIDIA, just enter the model of your graphics card (You will find this info when you expand the “Display adaptor” in the device manager) to find and download the latest driver package. Install the driver package afterward.
#3. Keep your laptop plugged in while gaming
Windows laptop usually has a battery management setting that places energy consumption “Balanced” when you are running on battery. While in this setting, the amount of power that can be drawn from the battery is regulated. Therefore, you may experience lag when the game becomes CPU intensive.
ALSO READ: How To Build A Gaming Laptop The Right Way—7 Steps
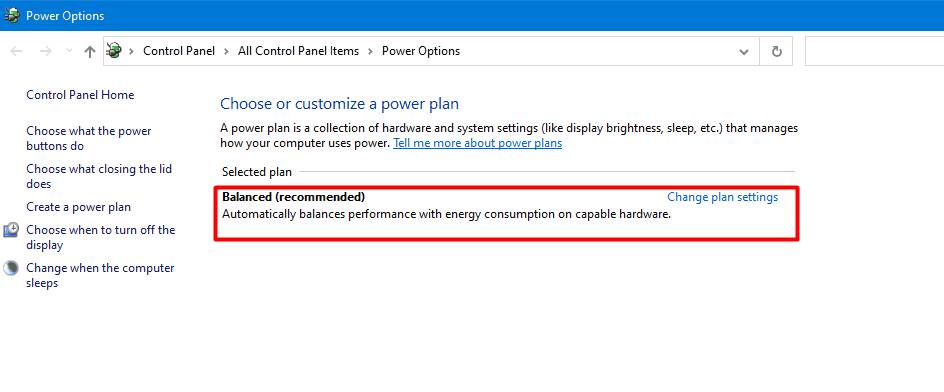
On the contrary, when you are plugged in, the default setting is “High Performance” and there is no restriction on the power that can be drawn by the CPU or graphics card. Although you can alter the battery setting to “High Performance”, it will cause your battery to drain faster.
#4. Activate Game Mode on Windows 10
Windows 10 introduced “Game Mode”. The settings help to minimize background distractions when gaming. Once activated, more resources will be channeled toward the game, allowing the game to harvest more of the laptop’s hardware resources.
The great thing about activating Game Mode is that it will only kick into action when you boot up your game. So, you don’t have to worry about activating it at the beginning of every game and turning it off at the end of your game.
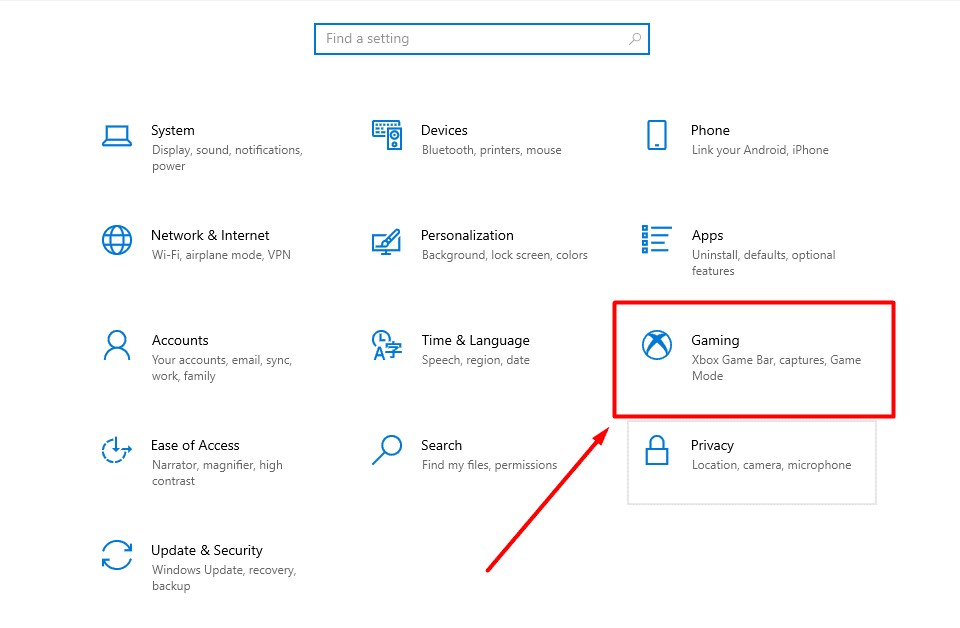
To activate the game mode, go to your settings and select “Gaming”
Then, Choose “Game Mode” from the left panel
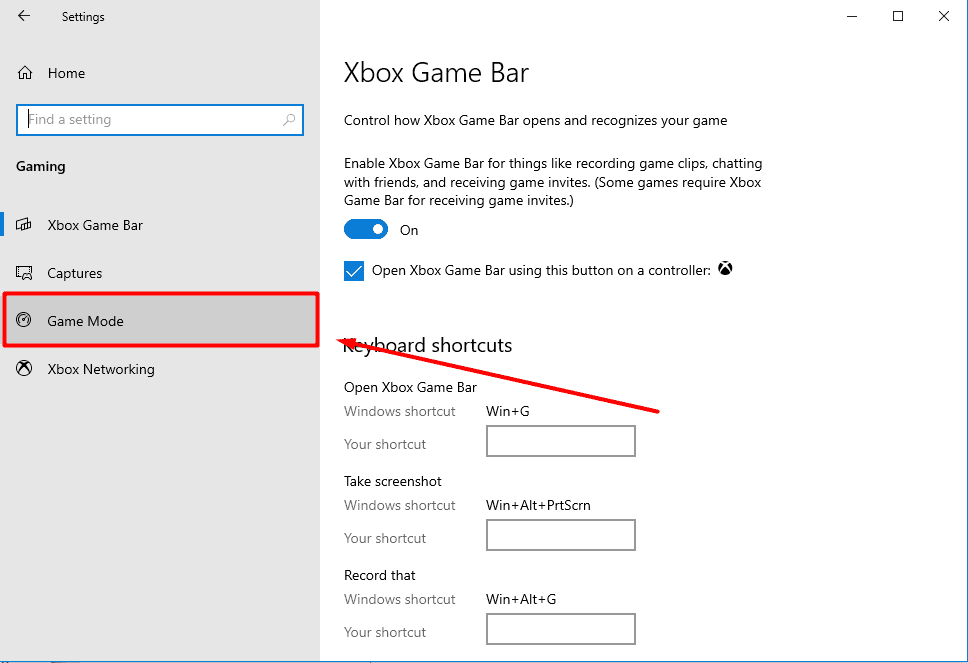
Toggle the button to on
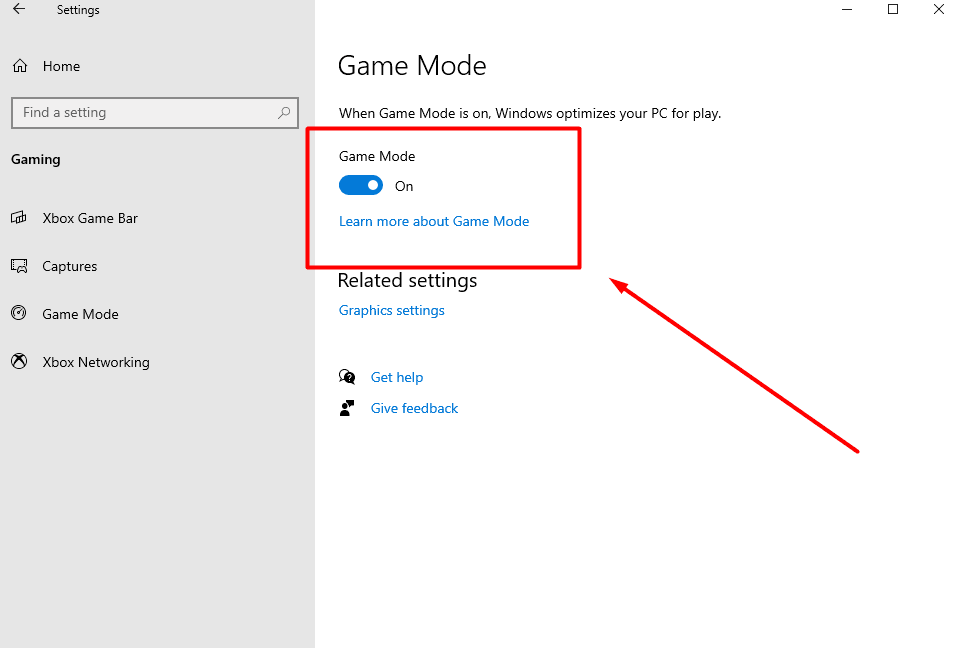
Alternatively, you can press the “Windows button” and “G” together and it will bring up the Game Bar. From there you can turn on the Game Mode. If this solves your game lag issue, congrats. If it didn’t, don’t despair, look at the next fix.
#5. Increase your fan speed settings
Nobody loves loud fan noise when playing games because it can steal your attention from the game. However, when it comes to optimizing a laptop for gaming, you are stuck with one of two evils. You either deal with the loud noise or your laptop overheats and your game will start to stutter.
As the CPU and GPU work harder during intense gaming, your laptop will definitely get hotter. Performance usually drops with increasing heat. Turning up the fan speed can improve the cooling which will allow your laptop to perform better.
If you are bothered by the noise, the best alternative is to use gaming headphones.
Optimize laptop for gaming: Hardware tweaks
If the software tweaks we listed did not solve your problem, it is time to move to hardware tweaks. Unfortunately, hardware tweaks usually involve some kind of purchase which costs money.
Nevertheless, with the right hardware tweaks, your game should run lag-free. Just like in the software tweaks, we will not talk about any complex solution that is difficult to achieve. All our solutions will be what you can do on your own or with a little assistance.
#6. Control heating with a cooling pad
If your laptop still runs really hot after increasing the fan speed, it simply means that the fans are not efficient. In this case, you may need a cooling pad to properly dissipate the heat produced by the CPU and GPU.
Cooling pads come in different shapes and sizes. The number of fans on a cooling pad can range from 2 to 6. Take note of the size of your laptop and make sure that your choice of cooling pad perfectly aligns with your laptop.
#7. Increase your RAM size
If your game freezes frequently during play or your laptop reboots unexpectedly, it is likely because your laptop has run out of memory. It is time to consider an upgrade to your system’s RAM.
Newer games are more memory intensive. Between 2000 and 2010, 8 GB RAM was usually enough to play a triple-A title. In 2023, you will need twice that amount to play fairly average games. If you have a laptop with less than 16 GB RAM, upgrading the RAM size can make a difference.
ALSO READ: 2 Ways To Play PS5 In Tesla Exposed
Some laptops have two RAM slots. If the first RAM slot has 8 GB RAM installed, all you need is to purchase another 8 GB and install it in the second slot to give you 16 GB RAM in total. However, if your laptop has only one slot for RAM, you need to take it out and get a single 16 GB RAM.
#8. Install your games on SSD
Solid State Drive (SSD) performs many times faster than hard disk drives (HDD). Newer laptops are coming with SSD. If your laptop came with HDD, it may be impossible to swap it out for an SSD—but that doesn’t mean there is nothing you can do about it.
You can purchase an SSD of your choice (preferably 512 GB) and put it in an SSD enclosure. Once this is done, you can use your SSD as an external disk. Instead of installing your games on your HDD, always install them on your SSD. You should see a significant improvement in your game.
#9. Clean your laptop
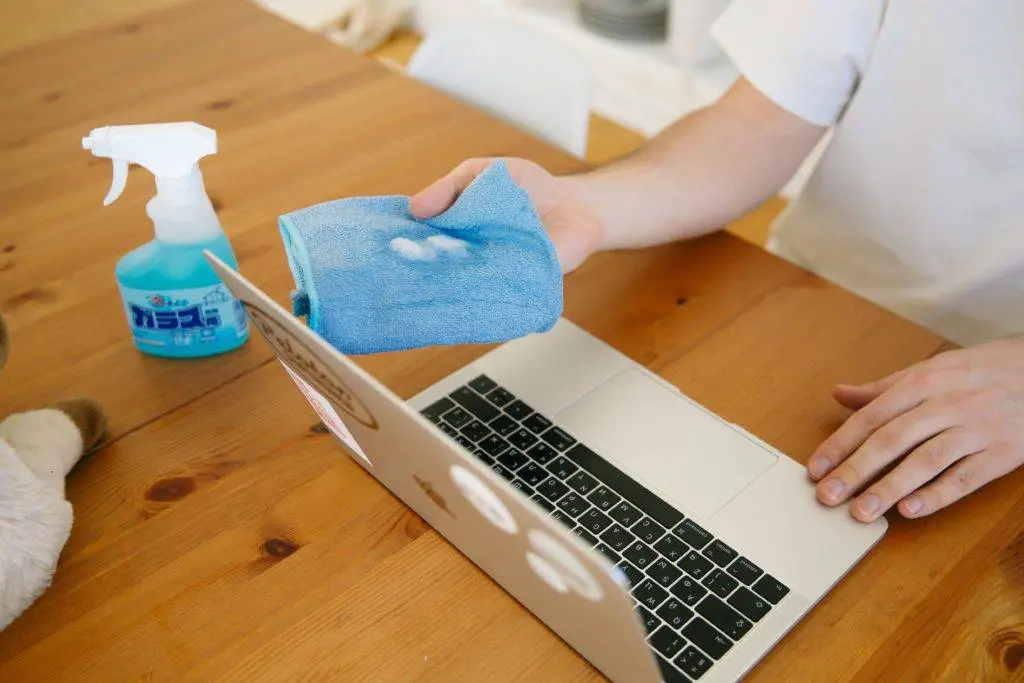
If your laptop used to run games smoothly but suddenly started lagging, one of the biggest culprits is dirt. As you continue to use your laptop, dirt will gradually begin to accumulate around the vents.
As dirt accumulates, the vents are partially or totally blocked off thereby reducing the efficiency of the cooling system. Your laptop will run hotter and its efficiency will drop. Unfortunately, just plugging in a cooling pad may not make a significant difference if your vents are clogged.
ALSO READ: 10 Female Video Game Characters Loved For Their Beauty, Brawn, And Bravery
The best solution is to first remove the dirt blocking your vents. We would advise that you use a handheld vacuum cleaner to target and suck up the dust clogging the vents. Alternatively, you can use an air duster to blast out the dust. However, make sure you do this outdoors or you will get the entire house messy.
#10. Use Ethernet instead of Wi-Fi
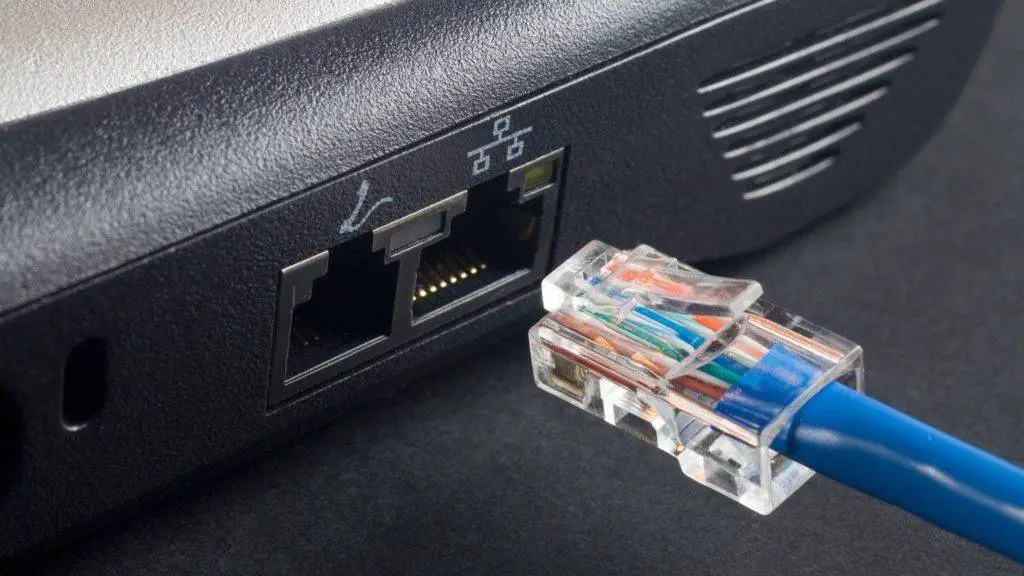
One of the biggest glitches with online gaming is lag due to poor network quality. In addition to affecting the quality of the game, such lags can be costly. It can lead to restarting an entire level.
Ethernet connection usually offers better and more stable connectivity compared to Wi-Fi. Some newer laptops lack an ethernet port. You can overcome this roadblock using an ethernet adapter that is plugged into your USB port.
What should you do if the problem persists after trying all the tweaks?
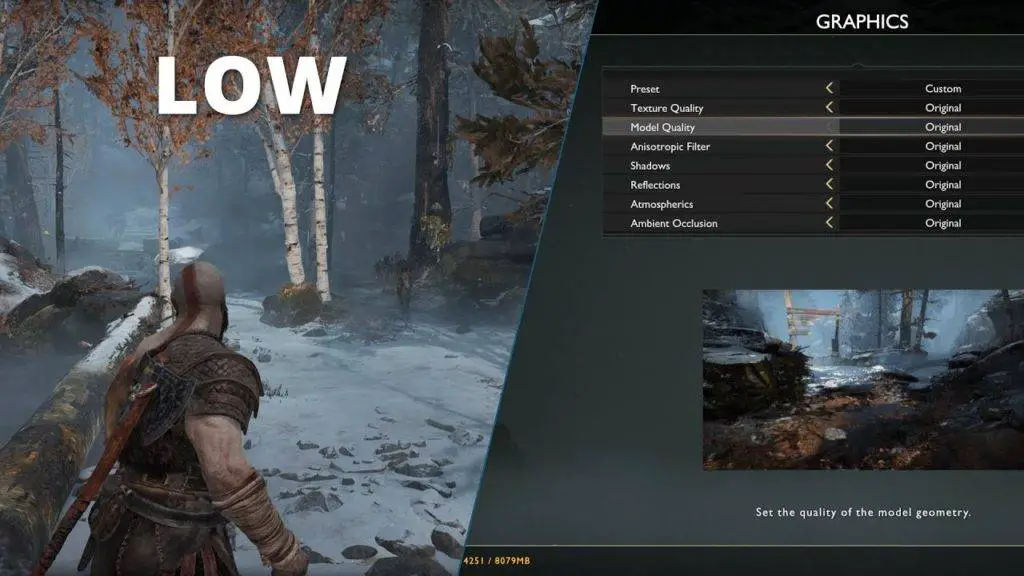
It is still possible that after trying the hardware and software tweaks your game may still experience lags, especially if it is a triple-A game like God of War. It simply means that your CPU and/or GPU did not meet the developer’s minimum recommendation.
In such situations, there is one more thing you should try. Go to the game settings and locate the graphic setting. Toggle all the graphics settings to the minimum. This will definitely affect how your game looks. However, in most cases, it should make the game playable with little or no lags.
Are there any other non-complicated means you use to optimize laptops for gaming that we missed? Feel free to share with us in the comment box below.
Remember to share and bookmark this website to stay up to date on all the hottest news in the gaming industry.


